One of my nerdy projects is, in fact, working on this website. Setting up a basic WordPress site isn’t super technical, and there are tons of tutorials on how to edit a WordPress site once its up and running. But I wanted to collect my steps for getting the server set-up and online, so I have something to refer back to the next time I want to get a website going. I wanted to do this cheaply since it’s really just for my own documentation, and there’s no way I’m going to make any money from this.
Domain Registration
I registered my domain with Google. I had used Google for a previous, short lived, web project, and I liked how straightforward it was. However, I registered the mynerdyprojects.com before I made the decision to use AWS to host the server. When registering a site that you plan to host with AWS, it probably makes more sense to use amazon’s route 53 instead. That said, registering through Google hasn’t created any problems either.
Amazon Lightsail
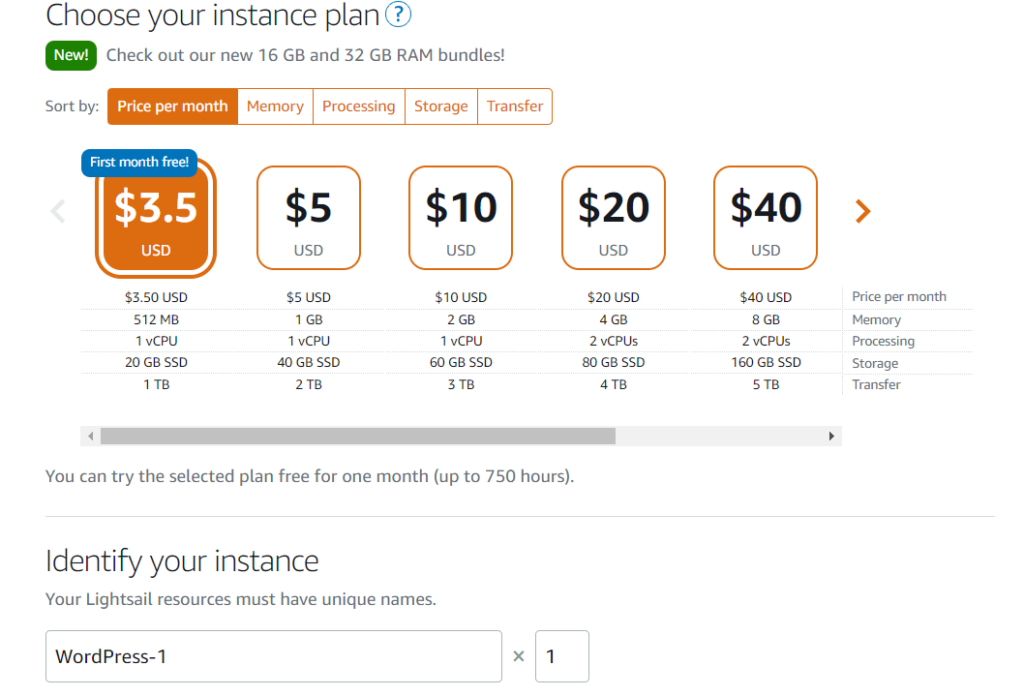
I chose to use Amazon Lightsail for hosting, mainly because a minimal instance only costs $3.50 a month for a preconfigured WordPress server, and all the routing and DNS support you need to get started. And if this inexplicable takes off, it’s fairly easy to increase capacity.
Creating the Instance
Creating the instance only requires a couple of steps.
- Register for an Amazon AWS account at aws.amazon.com. Then select Lightsail from the AWS Management Console.
- Select the Create Instance button.

- Select the Linux/Unix platform and the WordPress blueprint.

- Select the instance size / pricing tier, and name your instance. Then proceed with “Create Instance”

Setting up Routing
Setting up the routing and DNS was little more involved, but still not bad in retrospect.
- From the Lightsail main page, select Networking.
- Create a static IP address and associate it with your instance
- Create a DNS zone
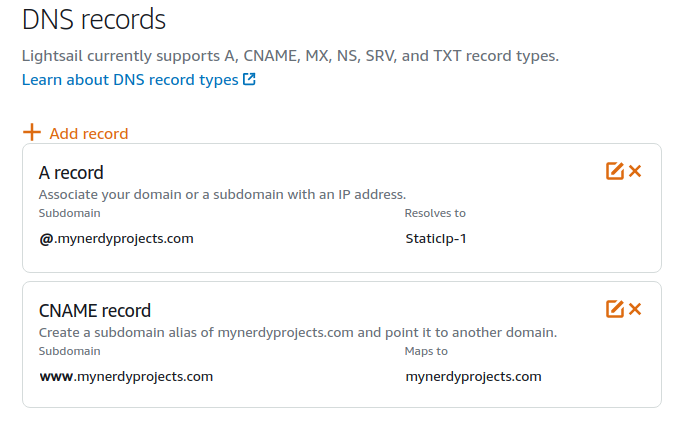
- Add records for each domain/subdomain that you want to map you domain. I created an A record associated with mynerdyprojects.com, and a CNAME record to may www.mynerdyprojects.com back to mynerdyprojects.com

- Add records for each domain/subdomain that you want to map you domain. I created an A record associated with mynerdyprojects.com, and a CNAME record to may www.mynerdyprojects.com back to mynerdyprojects.com
- After creating the DNS records, I had to change the name servers used by google to the ones provided by amazon.
- At the at domains.google.com select the domain for the current project
- Select “DNS” on the left hand sidebar.
- Select the use “custom name servers” radio button.
- Enter the name servers provided on the Lightsail networking page. In my case there were four name servers to add, but I don’t know if this is always the case or varies with the region.
It may take a little time for the name servers to update, but at this point your domain should be accessible form a web browser.
Setting up HTTPS
HTTPS is not enabled by default, but its an important step for any modern website. Even for static sites, using HTTPS helps protect your credentials as the site administrator, and its paricularly important if you plan to have users logging in, and submitting information or content.
- Log into Lightsail and select the instance where you want to enable HTTPS
- Select the “Log in using SSH” button. This will launch a terminal for your server instance inside a browser window.
- Run the command:
sudo /opt/bitnami/bncert-tooland follow the prompts. (additional bitnami documentation) For this projects I used mynerdyprojects.com as the domain, and enabled www-to-non-www forwarding, and http-to-https forwarding.
Finishing up and Next Steps
At this point the website should be reachable from a browser. But it is still configured with a default login to edit it. Follow the instruction to log in for the first time, and create a new user name and password to use for site administration. And don’t forget to disable the default user account. Now its time to pick a theme and generate some content.